What is the Bikubo-counter app?
Bikubo-counter is the application that allows event organizers to control access capacity manually, without needing to scan QR codes.


 Bikubo-counter
 Free, just for being a bikubo user
 Access with your unique bikubo.com username and password.
 Works on any Android or iOS mobile or tablet.
 Easy to use
 Multi-device: multiple access points can operate simultaneously.
 Online and offline, no Wi-Fi or internet needed
Access control. Press + or - to add or subtract attendees. You can also edit manually
Online and offline, no Wi-Fi or internet needed
Access control. Press + or - to add or subtract attendees. You can also edit manually
 Modular. With an adaptable menu according to event needs
 Statistics. Monitor event data
 Multi-user. You can add different users to manage each control point
The bikubo-counter app allows manual capacity control at events, with basic counting functions and advanced options for different needs.
To use it, first register on bikubo.com (from the app or web) and confirm your email, which is necessary to access the intranet and manage settings. If you forget your credentials, you can recover them from the website. With confirmed registration, log in and create a new event.
 Download the app


 Create an event with the control points you need to manage

 Go to the counter screen and add or subtract attendees from control points
Download the app
Create an event with the control points you need to manage
Go to the counter screen and add or subtract attendees from control points
Go to the counter screen and add or subtract attendees from control points
Download the app
Create an event with the control points you need to manage
Go to the counter screen and add or subtract attendees from control points
Events have associated control points where capacity control is performed. Therefore, you need to register the events and the necessary control points for each event on the platform.
 Title: Required field that identifies the event in the lists.
 Start date:
Required. Indicates when the event begins.
End date:
Optional. Indicates when it ends.
Start date:
Required. Indicates when the event begins.
End date:
Optional. Indicates when it ends.
 Schedule:
Required. Defines the schedule to generate statistics.
Schedule:
Required. Defines the schedule to generate statistics.
 Control points: At least one is required. They represent access points or elements to control (people,
objects, incidents, etc.).
Control points: At least one is required. They represent access points or elements to control (people,
objects, incidents, etc.).
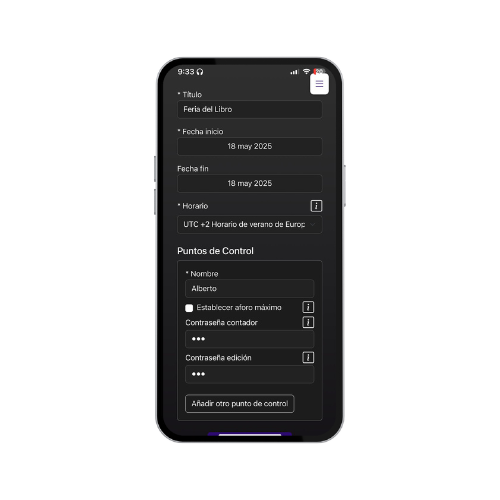
 Name:
Required. Identifies the control point in the lists.
Name:
Required. Identifies the control point in the lists.
 Maximum capacity:
Optional. Shows a progress circle; when exceeded, it turns red but continues
counting.
Maximum capacity:
Optional. Shows a progress circle; when exceeded, it turns red but continues
counting.
 Counter password: Optional. Protects the display and modification of capacity. If incorrect, it
will not be shown or changed.
Edit password: Optional. Restricts changes to current or maximum capacity. If incorrect, no
changes are applied.
Counter password: Optional. Protects the display and modification of capacity. If incorrect, it
will not be shown or changed.
Edit password: Optional. Restricts changes to current or maximum capacity. If incorrect, no
changes are applied.
Here you'll find the list of active events, where capacity control can be performed, and the list of archived events. The latter are no longer shown in the counter, but you can still view statistics and control point data from here.
View statistics: Shows
capacity by date and time, and access by control point. Allows downloading data in
XLSX format.
 View event details:
Shows control points, capacity, and allows editing or deleting their configuration.
View event details:
Shows control points, capacity, and allows editing or deleting their configuration.
 Edit event data:
Allows changing title, dates, and schedule.
Edit event data:
Allows changing title, dates, and schedule.
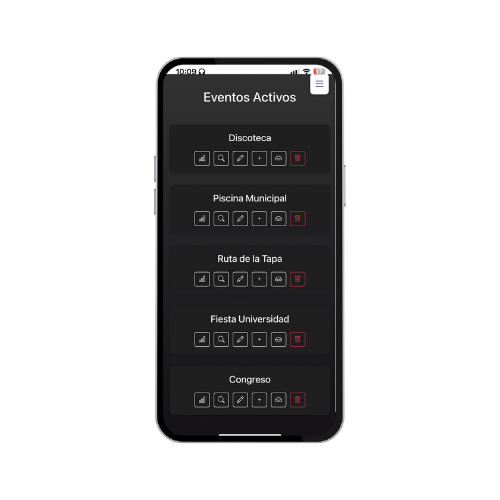 Allows creating a new control
point with the same fields as in event creation.
Allows creating a new control
point with the same fields as in event creation.
 Allows hiding the event
from the counter and active list, keeping its data in the archived section. From there you
can view statistics or reactivate it.
Allows hiding the event
from the counter and active list, keeping its data in the archived section. From there you
can view statistics or reactivate it.
 Allows deleting the event, removing it from the app.
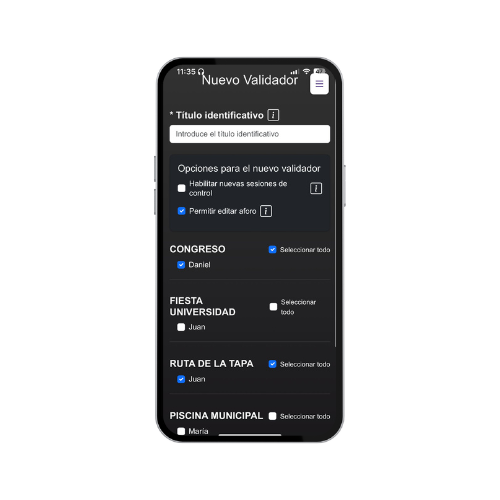
At Bikubo we understand that capacity control may require several people. That's why we incorporate the validator role, which allows assigning functions and permissions according to each role.
The same validator user can be used by multiple people from different devices to jointly manage a control point. The validator only accesses the counting module, while the administrator has full control over events, control points, and permissions.
Identification title: Text to easily recognize it
in lists and statistics.
 Access control: If activated, the validator
will be able to count in all new control points; if not, it will need to be enabled
manually.
"Change capacity" button: Allows modifying the
current and maximum capacity. If the point has a password, it must be entered. If this option is not
activated, the button will not appear.
Events and control points: Select which ones
the validator will be able to manage capacity for.
When saving, the system generates the username and
password visible in the validator list.
Access control: If activated, the validator
will be able to count in all new control points; if not, it will need to be enabled
manually.
"Change capacity" button: Allows modifying the
current and maximum capacity. If the point has a password, it must be entered. If this option is not
activated, the button will not appear.
Events and control points: Select which ones
the validator will be able to manage capacity for.
When saving, the system generates the username and
password visible in the validator list.
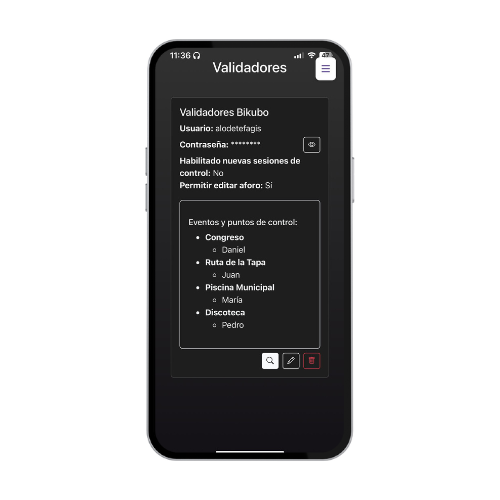 Identification title
 Username and password for access (visible when clicking the
eye icon).
Indicates if the validator can edit capacity or
automatically control new points.
Allows viewing statistics by event and control point
(download in XLSX format).
Shows the events and points enabled for the
validator.
Option to edit configuration or change the
password.
Possibility to delete the validator and revoke their
access.
Username and password for access (visible when clicking the
eye icon).
Indicates if the validator can edit capacity or
automatically control new points.
Allows viewing statistics by event and control point
(download in XLSX format).
Shows the events and points enabled for the
validator.
Option to edit configuration or change the
password.
Possibility to delete the validator and revoke their
access.
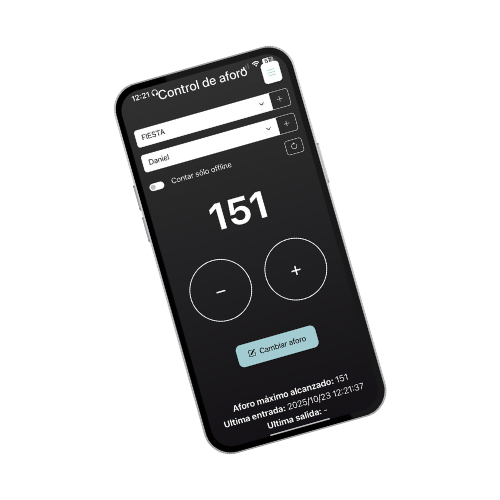
This module allows controlling the capacity of access points. First select the active event and then the control point (or "All").
If the point has a password, the system will ask for it before displaying the main capacity information on screen.
 Count offline only: allows adding/subtracting capacity
without connection and synchronizing later.
Current capacity: displayed large and in red if
the limit is exceeded.
Count offline only: allows adding/subtracting capacity
without connection and synchronizing later.
Current capacity: displayed large and in red if
the limit is exceeded.
 + and − buttons: to manually adjust
capacity.
Extra data: shows maximum reached and
allowed capacity.
+ and − buttons: to manually adjust
capacity.
Extra data: shows maximum reached and
allowed capacity.
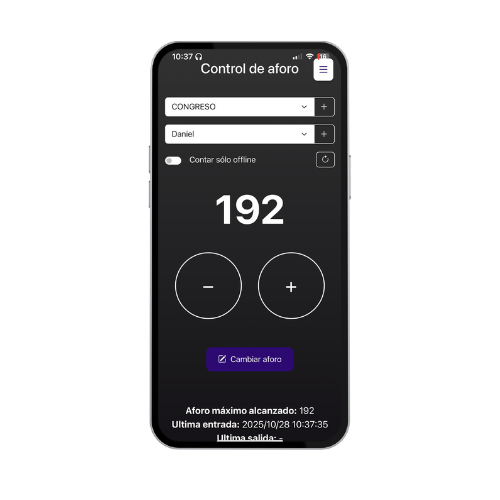 Identification title
 Update capacity: reflects changes made by
other validators.
Update capacity: reflects changes made by
other validators.
 Progress: circle with the occupancy percentage
relative to maximum capacity.
Progress: circle with the occupancy percentage
relative to maximum capacity.
If the "All" option is selected, information for each control point is displayed in a reduced format organized in horizontal layers, one per point.
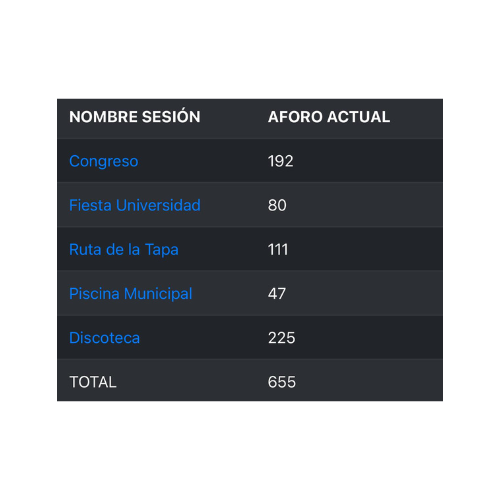
When clicking on this option in the side menu, a browser opens with the current total capacity for the different events, and allows clicking on each event to view the current capacity details at each control point
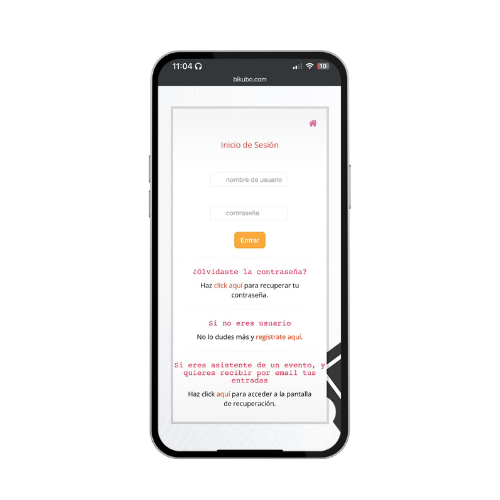
When clicking on this option in the side menu, a browser opens with the bikubo.com intranet access page. Login is done with the email and password entered during registration. In this intranet you can change the app password.
You can also perform multiple configuration options and advanced functionalities for event management. It can also be accessed from a computer/PC or laptop to perform some functionalities
Register now